Pro Tip Tuesday – All About Images (and gifs too!)
For today’s Pro Tip Tuesday, let’s talk about adding images to Canvas! Depending on the course you’re teaching, you may need images in your Canvas course site for a variety of reasons.
- A profile photo
- Charts, graphs, maps
- Art
- Just for fun (yeah, gifs!)
There’s a few ways to incorporate images into your course site. A “course image” that represents your course site (Dashboard), a Profile Photo, in Pages, or in Assignments or Quizzes. Images can be incorporated into the questions, or answer choices, in a quiz.
Images in Canvas are super easy to do, and Canvas has a lot of flexible options to allow you to be as creative as you want!
Dashboard
You can upload an image to display behind the course card in the Canvas Dashboard.
Accepted images include JPG, JPEG, GIF, and PNG files. For best practice, images should be approximately 262 pixels wide by 146 pixels high.
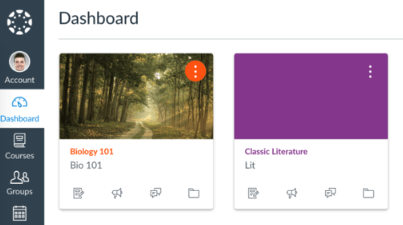
Canvas Dashboard course card
To add an image go to Settings > Course Details. Click on the Choose Image button. Then, you can choose a stock photo from Flickr (soon to change to Unsplash), or drag and drop an image into the indicated area, or click on browse your computer to find an image to upload.
Add a Profile Photo
There are two ways you can select a profile picture to use throughout Canvas:
- Upload a Picture from your computer
- Take a Picture using your computer’s camera (not supported when using Safari or Internet Explorer)
In Global Navigation, click on Account > Settings. Click the profile picture icon.
To upload a new profile picture, click on Upload a Picture, then click the choose a picture button. Follow the instructions from your computer to select and open a picture. Then use the selection boxes to crop your image. When finished, click Save.
To take a picture to use as your profile picture, click Take a Picture, then click the Take Picture button.
Pages (or your home page)
Images may be added to Pages through the Content Selector, or through the Rich Content Editor toolbar.
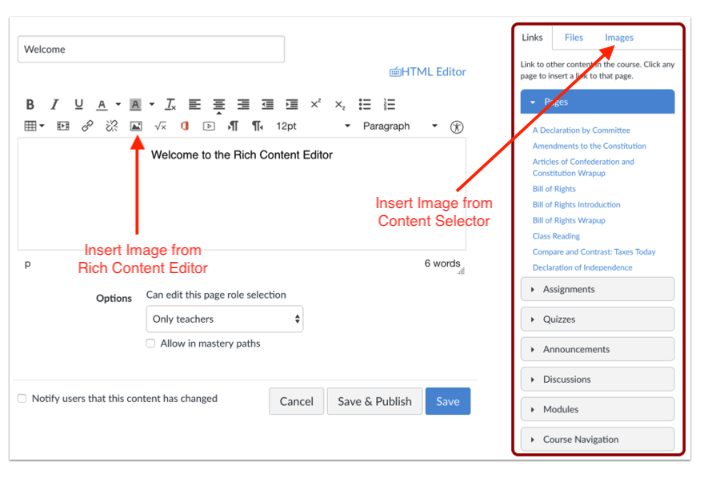
Two ways to insert an image on a Page
You can select an existing image that has been uploaded to your Files area, or upload a new picture.
Insert an image from Rich Content Editor

To embed a previously uploaded image, click the image you wish to embed from the Course files [1] or My files [2] area.
To upload an image from your computer to embed, click the Upload File button.
To add alt text to your image, insert text in Alternative text. To add the image as decorative, click the Decorative Image box.
Click Update.
Insert an image from the Content Selector

Click the Images tab. You have the option to link to existing course images [1], search the Flickr Creative Commons site (soon to be Unsplash) [2] or upload a new image [3]. If you choose to upload a new file, select a folder for the file [1]. Click the Choose File or Browse button [2]. Click the Upload a new image link to add a new image to the course.
Click the Upload button.
Assignments and Quizzes
Both the Assignment tool and Quiz tools (including the upcoming Quizzes.Next tool) in Canvas have access to the Rich Content Editor and the Content Selector. So images, charts, graphs, maps, etc. may be added to the instructions for an assignment or quiz as well as Quiz Questions and Answer boxes (for Multiple Choice and Multiple Answer question types)!
Create Quiz Question with Rich Content Editor
Use the Rich Content Editor to include video, images, math equations, or flash activities. Click on the image icon in the toolbar to add pictures to your question text [1]. Then, you may work on your Question response options [2] which may also include images and other rich media.
Note: Currently, images and rich media are only supported in the “question response options” for Multiple choice, and Multiple answer question types.

Create Answers with Rich Content Editor
To create your answer with the Rich Content Editor, hover over the response and click the Edit icon [1]. This switch will allow you to post images, video, audio, math equations, and more in the answer response. Click the image icon to add pictures. Click the Done button when finished [2]. Then, when finished with this question, click Update Question.

Hope you enjoyed this Pro Tip Tuesday all about images. If you have any questions, feel free to reach out to canvashelp@wpi.edu.