Getting Set Up in the Lab
Use this step-by-step guide to get started working with C. elegans in the lab.
Before coming into lab for your first day:
- Print out this handout and read before coming into lab: Albrecht Lab New Member Info
- Read this article for information on basic C. elegans maintenance practices: C. elegans Maintenance
- Read the “Getting Started With C. elegans” page featured here on the Albrecht Lab website: Getting Started With C. elegans
On your first day in lab:
- Obtain a plastic storage box for your worm plates, a lab notebook, and a storage drawer. Label the box and your drawer with your name on a piece of tape. Use the drawer as your personal storage site for all things lab related such as experimental materials, lab notebook, and room temperature worm plates.
- Make a worm pick using a glass Pasteur pipette, platinum wire and a hot flame. Carefully insert the platinum wire into the tapered end of the glass pipette using tweezers to hold the wire. Rotate the pipette and wire combination over a hot flame to gently melt the glass securing the wire in place. Use a tool to flatten the end of the wire into a spatula shape. This makes picking and transferring worms much easier. Everyone likes their pick shaped a little bit differently, so as you practice worm picking feel free to adjust your pick as needed. Use this video as a reference:
- Obtain a plate of “N2” strain worms. These worms are the commonly accepted wild-type strain of C. elegans that have been isolated from Bristol, England.
- Get comfortable on the stereoscopes in lab. There are 5 microscopes in lab that can be used to maintain your worm lines. Each scope has an adjustable light source, adjustable magnification and adjustable focus that will allow you to visualize your worms properly to pass and maintain them. Use your plate of N2 worms and practice adjusting the scope to get acquainted with how they work. Make sure you have a chair that feels comfortable while using the microscopes as you could be spending a lot of time there!
- Observe a plate of worms. Now that you are comfortable with the scope, take some time to look at the N2 worms. Observe their movement, see if you can visualize their food source (E. coli OP50 strain), and gain a general idea of their “natural” behaviors on an agar plate.
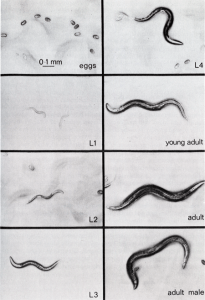
- Identify the different life stages. On your agar plate you should be able to see different sized worms depending on what life stage they are in. You should also be able to see eggs. Spend some time to see if you can identify some of each life stage: Egg, L1, L2, L3, L4, Young Adult, Adult. Use the pictures below as a reference:
7. Practice transferring worms from original plate to a plate with food. Now is your first chance to try worm picking! Using the new worm pick that you made, practice transferring worms from your original plate to a new “seeded” plate. Seeded plates contain a spot of OP50 E. coli food for the worms to eat. If an “unseeded” plate is referenced, we are referring to a plate with no food, just agar. Picking worms is a difficult technique to learn and takes some time. When first starting out in the lab, practice as much as possible. Review the YouTube video above and follow these steps below to pick worms:
- Go to an open microscope. Get your worms into focus on the scope.
- Flame the end of your worm pick using an ethanol burner or gas burner to sterilize
- Go to the plate that contains worms and remove the cover. While looking through the scope, find a worm you want to transfer and gently place the sterilized pick end onto the agar by the worm of interest. be careful NOT to puncture the agar surface.
- Swipe your pick on the surface of the agar to lift the worm of interest. Re-cover plate with worms.
- Change to your empty plate with food. Remove cover and, while looking through the scope, place the picked worm onto the new plate by gently touching the surface of the agar with the pick. Again, be careful NOT to puncture the agar. Hold it there until the worm crawls off or gently slide the pick so that the worm gets pushed off.
- Sterilize the pick between each pass. Keep the covers on the plates as much as possible to avoid contamination
TIP: Use a glob of OP50 from the plates to help the worm “stick” to the pick.
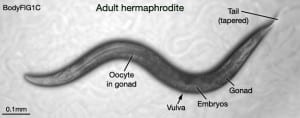
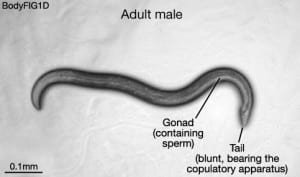
8. Identify the different sexes. While practicing your picking skills, become familiar with the differences between a male and a hermaphrodite worm. In the wild-type population, males occur only 0.1% of the time so you will not be able to identify males using a normal N2 plate. We have special lines for observing males called “him” lines. Adult males are smaller than adult hermaphrodites. They also have a “spade” at the end of their tails rather than a pointed, tapered tail as the hermaphrodites do. You can observe the differences with these pictures below:


