What is Lecture Capture?
Lecture capturing is a service offered through the Academic Technology Center at WPI. When you “capture” a lecture, you are recording and/or live streaming your lecture for students to view. Lecture capturing can be done in a WPI classroom or remotely, via software on your own computer.
This blog post covers how lecture capture is done in a classroom. Instructors and Staff can request automatic lecture capture, in which the recording will start and stop at the times you indicate in this form:
http://www.wpi.edu/+echorequest
Or, you can choose to start and stop a lecture recording by yourself. We call this an ad-hoc capture.
The process of lecture capture has three steps. Regardless of whether you’ve chosen to let the recordings start automatically or are creating an ad-hoc captures, it’s helpful to understand the steps.
2. Check Inputs and Press Start

1. Create the Metadata
For people teaching in a classroom who have notified us that they want to have their classes captured automatically, the metadata of the lecture capture is already existant. All they need to do is show up at the classroom and bring down the projector. However, while the metadata is entered via the user interface, knowing how to access the user interface is useful even if you do not have to create metadata for your lecture because the ui is also the home to the input and recording controls.
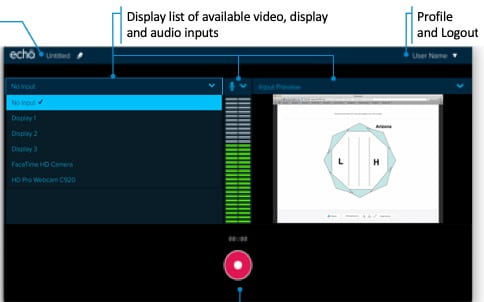
To access the user interface, click on the Echo360 capture shortcut on the podium PC.

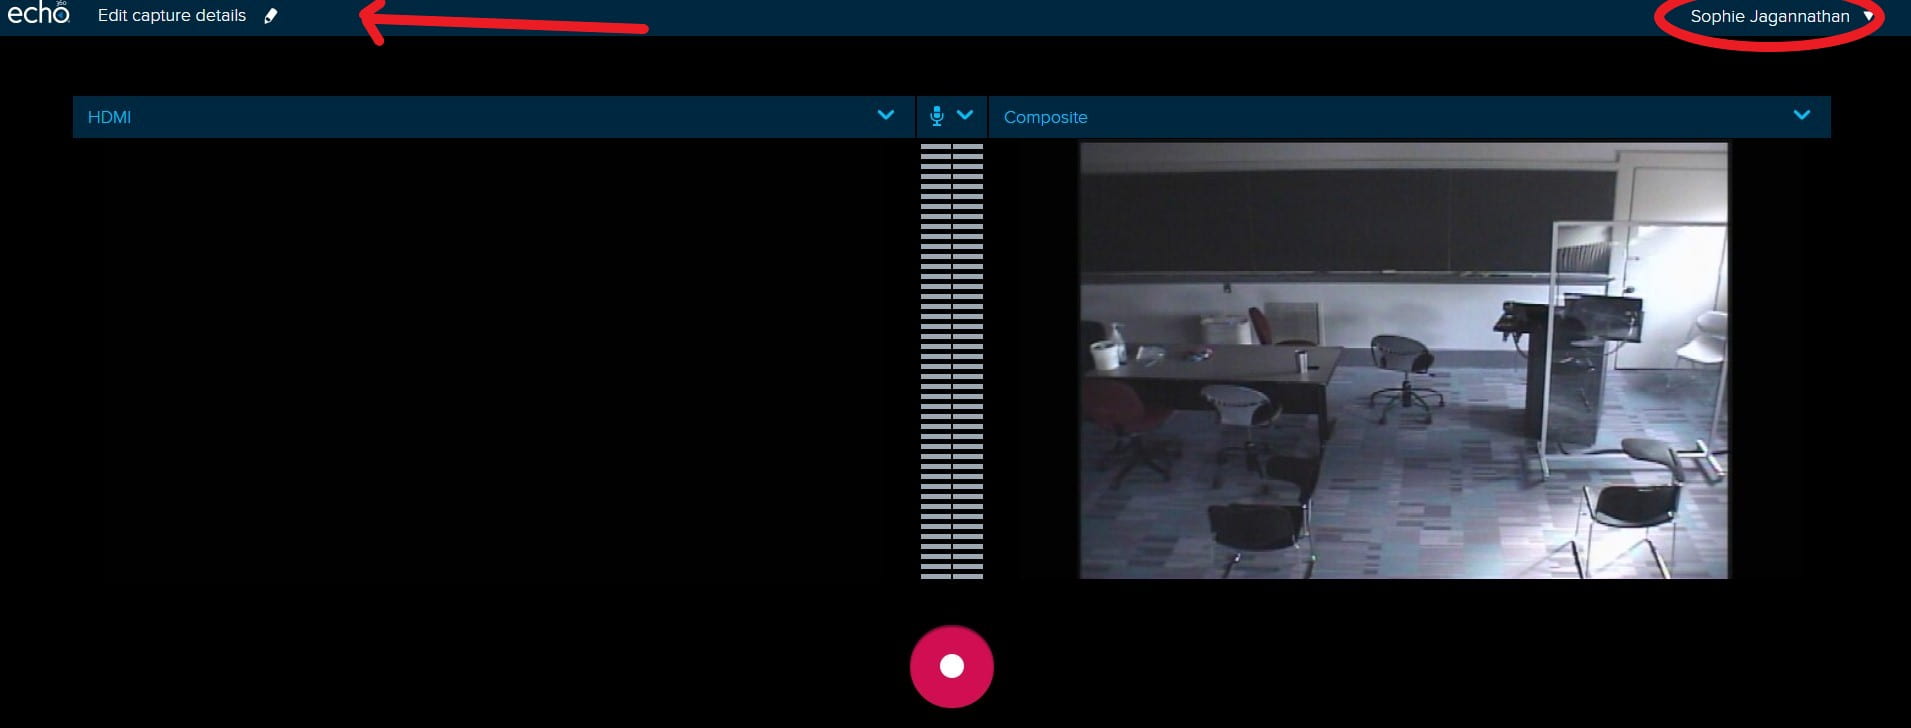
If the shortcut is not available, please contact the Technology for Teaching and Learning Group and we will provide you with the URL. Once logged in, you will see your name, as circled below. Click Edit Capture Details (upper left).

On the right, click the drop down menu on “Publish To”. You’ll see some choices of location where the video can be shared. To stream live, choose to “Publish” to your course section. This enables students to view the live stream from your Canvas course site. The “Publish” field establishes that connection; if you choose library, the video will not live stream.
The “Class” field should just be a new class. It basically means that you are streaming and posting new material, not replacing old.
These capture details should be in place before you start recording. If they are, then move on to step 2.
2. Check Inputs and Press Start
Once the metadata is sorted out, it’s time to establish the inputs and start the recording. In this context, inputs are the audio/visual signals that are going to the lecture capture.
If your lectures are scheduled to automatically record, you don’t have to worry about establishing these, either, although you will want to confirm they are present.
- Graphical input: Using the control panel on the podium in the classroom, bring the projector screen down. Route your desired source to the projector. The recording takes a feed from the projector. Students in the classroom will be seeing the same thing as viewers of the stream (or recording) will see. Some WPI classrooms have two projectors. If that’s the case for your classroom, please make sure that whatever you want captured by the system is sourced through to the right projector.
- Audio: Each classroom (except in The Innovation Studio) has a gooseneck microphone attached to the podium. It’s flexible neck allows you to adjust it’s direction. This microphone will automatically pick up your voice, as long as it’s pointed towards you, and send it to the recording system.
- Video input: Most rooms also have a wall or ceiling mounted camera which will pick up your image in the front of the room. The camera framing is fixed, in a long, wide shot towards the front of the room. t can not be adjusted. Because of the camera’s position, the shot will not pick up writing on the chalk/whiteboards. If you want to write, please use the document camera or annotate on the PC and route that to the projector.
There are two windows for visual inputs. They can be set by clicking the dropdown menus just above the input windows.
Once you’ve established your inputs and have your capture details set, click the red button (as shown above) to start the recording.
The below image shows a classroom recording at the 21 minute and 51 second mark.

Engaging with Viewers
Viewers of a live stream can engage with you through the discussion feature. Since you are streaming to your course section, students can “tune in” to the live stream from the Echo360 section of their Canvas course site.

From there, they click on the green live button and then choose to show the live stream.
Once the live stream is showing, they can click the discussion icon to post a question about your lecture.
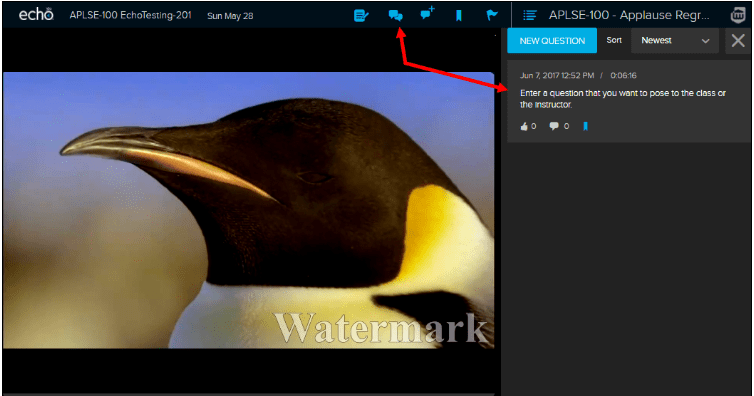
To reply, you can also “tune in” to your stream on Canvas and click the discussion feature. By selecting the question, you will have the opportunity to post a reply.
At the end of your classroom session, your video is processed by the Echo360 system for delivery on demand. Viewers can watch asynchronously and continue to use the discussion feature to ask questions.
Currently, WPI has over 50 locations on campus with the capability to record lectures.
Here is a list of classrooms:
WPI Main Campus
Alden Hall, room B30
Atwater Kent, room 116
Atwater Kent, room 219
Atwater Kent, room 232
Atwater Kent, room 233
Fuller Labs, room 222
Fuller Labs, room 311
Fuller Labs, Lower Perrault
Fuller Labs, Upper Perrault
Fuller Labs, room 320
Goddard Hall, room 012
Goddard Hall, room 227
Higgins Labs, room 031
Higgins Labs, room 114
Higgins Labs, room 116
Higgins Labs, room 154
Higgins Labs, room 202
Higgins Labs, room 218
Higgins Labs, room 230
Kaven Hall, room 116
Kaven Hall, room 202
Kaven Hall, room 203
Kaven Hall, room 204
Kaven Hall, room 207
Olin Hall, room 107
Olin Hall, room 109
Olin Hall, room 126
Olin Hall, room 218
Olin Hall, room 223
Salisbury Labs, room 011
Salisbury Labs, room 104
Salisbury Labs, room 105
Salisbury Labs, room 115
Salisbury Labs, room 123
Salisbury Labs, room 305
Salisbury Labs, room 402
Salisbury Labs, room 406
Salisbury Labs, room 407
Salisbury Labs, room 411
Stratton Hall, room 106
Stratton Hall, room 202
Stratton Hall, room 203
Stratton Hall, room 304
Stratton Hall, room 306
Stratton Hall, room 308
Stratton Hall, room 309
Washburn Shops, room 229
Washburn Shops, room 323
Gateway Park
50 Prescott St. (Gateway II): room 1226
60 Prescott St. (Gateway I): room 1002
60 Prescott St. (Gateway I): room 2233
60 Prescott St. (Gateway I): room 3101
60 Prescott St. (Gateway I): room 4101
60 Prescott St. (Gateway I): room 4104
If you have any questions about getting started with lecture capturing at WPI, please let us know by emailing atc-ttl@wpi.edu.