Sanitation Step-By-Step
Preparation of Piping
- Marked seven pipes for perforation.
- Marked at 5 and 7 o’clock every 15cm beginning at 30cm.
- Drilled holes on the center of the markings.
- Attached caps onto the end of each perforated pipe where the last drain hole is 15cm from the end.
- Cleaned the inside of the cap and the outside of the pipe.
- Placed PVC cement on both the inside of the cap and outside of the pipe.
- Attached the pipe and cap.
- Twisted the cap a quarter of a turn to remove air bubbles.
- Attached appropriate fitting (elbows, T-pieces) to the opposite end of each perforated pipe
- Dry-fit pieces together so that perforated holes are facing down
- Drew markings across attachment gaps to ensure alignment when gluing
- Glued pieces together using PVC cement
- Twisted the fitting a quarter of a turn, matching the lines drawn for alignment purposes.
- Built a u-bend to be used as an access point for testing purposes.
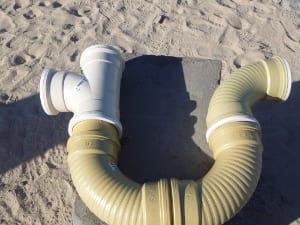
U Bend
- Measured placement of greywater trenches and marked using stakes and strings.
- Determined an estimated location of the outlet pipes near the fence, and marked it with a stake.
- Measured a distance of 7m away from the outlet pipe to the area designated for the leach field.
- Marked out trench for the distribution trench (4.5m x 0.5m for the greywater leachfield and 2.9m x 0.5m for the blackwater leachfield) with the longest side parallel to the fence.
- Dug the trench until it is 0.5m deep.
- Measured placement for the finger trenches and marked with string.
- Dug trenches until it they are 0.7m deep.
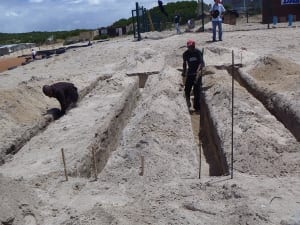
Trenches
- Leveled the bottoms of the trenches.
- Placed a 3m level across the top the trenches, making it level using bricks and sand.
- Placed a brick beneath the level in each trench.
- Measured the distance between the top of the level and the top of the brick.
- Adjusted the height of the bricks until the trenches are an equal distance below the level.
- Level the trench by using the bricks from 5(a) as a reference point.
Leach Field
- Place the 3m level on the bricks
- On the opposite end, place bricks until the level is level
- Move the level to the set of bricks just placed and repeat the process
- Use this process for the remaining trenches
- Adjust the height of the trenches as necessary, adding or taking away sand until they are level
- Add gravel so that it is level at least 0.3m from the top of the trench.
- Install 110 mm piping
- Lay each pipe in its respective trench, with perforated holes facing down
- Cut pipe to connect the perforated pipes
- Measure the distance between each fitting
- Mark that distance on a pipe
- Cut the pipe using a handsaw
- Dry fit connecting pipes to ensure proper length, make adjustments as necessary
- Glue connecting pipes in place.
- Level piping.
- Use a 3m level to level the distribution pipe.
- Add or remove sand from under the pipe until it is level across the distribution trench.
- Using the distribution trench as a fixed point, level each pipe in the finger trenches in the same manner
- Fill around the pipes in the finger trenches with gravel so that only the top of the pipe is showing.
- Lay irrigation cloth over each pipe in the finger trenches.
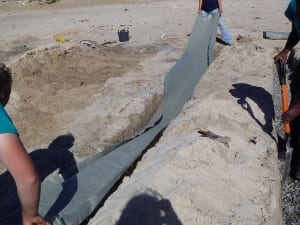
Cover with Irrigation Cloth
- Cover the pipes with sand.
- Compact the newly placed sand.
- Wet the sand using a hose
- Using a tamper, tamp the new sand in each trench
- If necessary, add more sand after tamping until the area is level with the ground
Installing Septic Tanks
- Staked off area for both the greywater and blackwater tanks in the designated location
- a. 2.2 (l) x 1.4 (w) x 1.4 (h) (meters) for the greywater tank
- b. 3.6 (l) x 2.2 (w) x 1.7(h) (meters) for the blackwater tanks
- Dug the holes for the greywater and blackwater tanks.
- Leveled the bottom of each hole
- Made concrete for pad beneath the tanks.
- Used a cement to sand ratio of 1:3 (one bag of cement for every three wheelbarrows of sand).
- Added water until desired consistency was reached.
- Placed a layer of concrete 0.08m thick covering the bottom of each hole.
- Leveled using a straight piece of wood with a level placed on top of it.
- Allowed the concrete to dry for half a day.
- Placed the tanks into the appropriate hole (making sure the blackwater tank with the baffle is on the appropriate side of the hole).
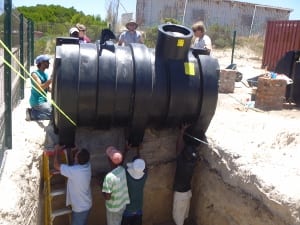
Lowering Tank into Place
- Adjusted the tanks as necessary.
- Adjusted height of the blackwater tank without the baffle so its outlet is higher than the inlet of the baffled tank
- Installed an access point for the first compartment of the baffled blackwater tank.
- Ensured tanks are spaced and leveled properly.
- Simultaneously fill the tanks with water while filling the hole with concrete (this is done so the tanks will not collapse from the pressure of the concrete)
- Made the concrete.
- Placed concrete into hole until 1/3 of the way filled.
- Placed sand into the hole until the sand reaches a level that is 20cm below the manhole cover.
- Placed another layer of concrete until it is only 2cm below the manhole cover.
- Leveled concrete in same manner as 5(a).
- Placed concrete in the manhole covers.
- Use concrete that is made with stone and is a 1:5 cement bag to wheelbarrow of sand ratio.
- Place trash bags over the cement, weighing them down with bricks, to slow the drying time to allow for stronger concrete

Installation of Outlet Pipe
- Mark out piping for the connection between the tanks and their respective leach field.
- Mark the outlet location of the tanks with a stake.
- Determine appropriate path connecting the outlet to the leachfield (i.e. which pillars to put the pipes next to, the shortest distance between the outlet and the leachfield, etc.)
- Mark the designated path using stakes
- Tie string between the stakes and level with a string level.
- Measure horizontal and vertical distances to determine the available pitch.
- Dig connecting trench for the pipe that leads directly into the entrance of the leach field.
- Create a smooth, even slope (which is 1m down for every 40m across) throughout the trench.
- Dig trench a little deeper to accommodate for the u-bend.
- Dry-fit piping for the rest of the trench
- Mark all angles on joints to ensure appropriate fitting.
- Check the pipes to ensure appropriate angle is reached
- Adjust pipe levels accordingly by adding or taking away sand.
- Glue piping together using the same method as described in “Preparation of Piping” steps 3(a)-3(d)
- Cover piping with sand, placing sand beneath the pipes first to ensure pipes do not bow, and then carefully place sand above the pipes
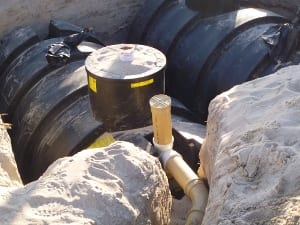
Blackwater Outlet
Installation of Inlet Pipe
- Mark out piping for the connection between the tanks and the location of the ablutions container.
- Mark the inlet location of the tanks with a stake.
- Determine appropriate path connecting the inlet to the ablutions container (i.e. which pillars to put the pipes next to, the shortest distance between the inlet and the container, etc.)
- Mark the designated path using stakes
- Tie string between the stakes and level with a string level.
- Measure horizontal and vertical distances to determine the available pitch.
- Dig the connecting trench for the pipe
- Create a smooth, even slope (which is 1m down for every 40m across) throughout the trench.
- Dry-fit the piping in the trench
- Mark all angles on joints to ensure appropriate fitting.
- Check the pipes to ensure appropriate angle is reached
- Adjust pipe levels accordingly by adding or taking away sand.
- Label the inlet pipe
- Place a 90° bend on the end of the pipe located under the ablutions container
- Adjust the 90° bend so the shorter pipe attached to it is vertical, sticking out of the sand
- Place a cap at the end of the pipe
- Label the cap “graywater” or “blackwater” in accordance with the tank it connects to
- Glue piping together using the same method as described in “Preparation of Piping” steps 3(a)-3(d)
- Cover piping with sand, placing sand beneath the pipes first to ensure pipes do not bow, and then carefully place sand above the pipes.
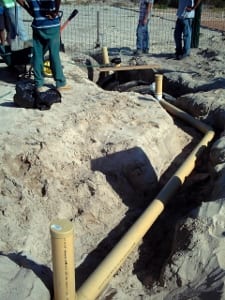
Inlet Piping
Installation of Venting
- Dig a shallow trench for the vent pipe along the fence
- Install vent piping
- Run a pipe from the vent, the length of the tank toward the fence, and then to the corner fence post.
- Run a vertical pipe along the fence post
- Attach a u-bend to the top of the pipe to prevent rain from falling inside the vent
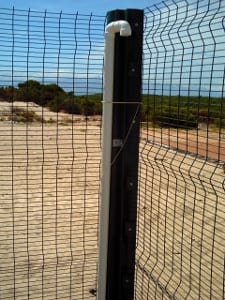
Vent Pipe
- Cover the horizontal vent pipes with sand


